
My daughter recently celebrated her birthday with a gorgeous winter wonderland theme and asked me for some help with the decorations. So I made these beautiful 3D star lanterns along with this easy to make winter wonderland banner. We hung the stars from the ceiling and they looked absolutely amazing all lit up. So today, I’m going to show you how to make a paper star lantern yourself.
If you enjoy paper lanterns, then make sure to check out my other popular paper lanterns like these Christmas Light Box Lanterns or this Halloween Light Box.
These star lanterns can be made with any color paper to customize for different holidays and occasions. But, if you want to duplicate this winter wonderland color theme, then here are the exact materials that I am using.
This post contains some affiliate links for your convenience (which means if you make a purchase after clicking a link I will earn a small commission but it won’t cost you a penny more)! Read my full disclosure policy.
To get the free paper star lantern template, enter your name and email into the form below and then click the “Get It Now!” button! If you have any issues with the form, then click here to open the form in a new window.
Please remember these are for personal use only. If you’re looking to sell products using these designs, please purchase a Commercial Use License here.
Make sure to share this 3D paper star lantern tutorial on Pinterest so you can come back to it anytime! Plus, it makes a HUGE impact to keep SVG Nation’s designs free to you. Just hover over the graphic below and click the pin icon.

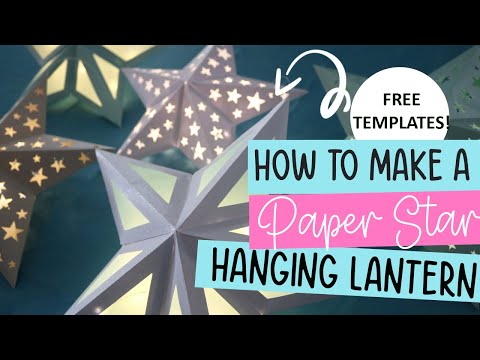
Learn how to make these gorgeous paper star lanterns in this video tutorial or keep scrolling if you prefer a step-by-step tutorial.
Before cutting out your 3D paper stars, there are some modifications needed to the SVG file in Cricut Design Space. First, upload the paper lantern SVG file to Cricut Design Space. For help with uploading SVG files to Cricut Design Space, you can check out my tutorial here.
Click on “Ungroup” to ungroup all of your layers. One each star layer there is a group of lines that you need to modify. Click on the group of lines and then change the operation from “Basic Cut” to “Score”. Then click the layer above it to select the score lines with the star piece and select “Attach”. Repeat this for all 5 star pieces.
Note: If you do not have a scoring tool then you will delete the lines instead.

If you don’t want to add the clear vellum pieces, then delete the triangle pieces as well. I prefer using the vellum with the other star design, but it looks great with both designs.
Once you’ve added your score lines, cut out your pieces with your Cricut (or whatever cutting machine you have). If you are making the paper lantern with the star cut outs, you can save the stars to use as confetti.
Step 1 – If you are using the vellum for your paper stars, start by gluing the triangle pieces to the inside of your star pieces. Repeat this for all 5 sides of your star. While I recommend using hot glue for assembling the stars, a regular craft glue is best for gluing on the vellum pieces.

Step 2 – Fold in on all of the long score lines so that they fold into a 3D shape when brought in together. Then fold on the opposite direction for the 2 tab pieces on the bottom.

Step 3 – If you want to hang you star lanterns, then you will need to add a piece of string to one of the 5 star sides. I prefer clear fishing string so that it’s not as noticeable. To do this, add some glue along the top top of the long tab piece and place the end of the string here. Hot glue is going to be the best glue to use for this and for assembling your stars.

Step 4 – Then add hot glue along the full length of this tab piece (even on top of where you glued your string if using string). Fold the sides in and attach the other side to the glue to close this piece together. Repeat steps 2 and 4 for the other 4 sides of the star. You only need to glue the string to 1 of the star sides.

Step 5 – Attach the star together by gluing each star side on one by one. You will glue the side that doesn’t have the tab pieces on top of the side with the tab pieces. Continue to repeat this until all sides are attached.

Step 6 – If you want your paper star lantern to light up, then add your fairy lights to the inside of the star before gluing the last side down. You will leave the battery pack on the outside of the star where the middle point in. Tape it down to the back of the star at a place where you can semi lay it flat. And then finish fluing the last side of the star together.
I recommend using fairy lights like these Fairy String Lights that have a battery pack. This way when the lights go out, you can replace just the battery instead of taking the lantern apart to replace the lights.

And that’s all there is to it! When you’re done, hang the lanterns from the ceiling or place them around the room. Light them up for a truly magical effect!

When you’re done, make sure to post these in my crafting group here or tag me if you post them on social media. I absolutely love seeing your crafts and can’t wait to see your Star lanterns.
For over 4 years, I've been sharing Cricut craft tutorials and Free SVG Files here as well as on my YouTube channel. I love a good paper craft just as much as making fun, customized shirts and sharing Cricut craft ideas.

Welcome! I'm so glad that you're here! I'm a graphic designer and love creating SVG Files for hobby crafters and small businesses. I help Cricut users learn how to create and edit their own designs and to get the most out of their cutting machine with my tips and tutorials.